CLICK HERE FOR FREE BLOGGER TEMPLATES, LINK BUTTONS AND MORE! »
Showing posts with label Animals. Show all posts

Thursday, March 17, 2011

Cinnamon Bear

I wrote last week about ice cube painting being an excellent sensory experience for little ones.  Here is a way to throw another sense to the mix!

You will need:

Card stock (or cardboard) cut into a teddy bear shape.
2 Cinnamon ice cubes (water with 1/2 tsp of cinnamon mixed in, frozen)
Ziploc type bag. 

First you will need to make a couple cinnamon ice cubes. Fill ice cube tray with water.  Mix 1/2 tsp of cinnamon in each section (you only need to make 2 ice cubes per bear).  Freeze.

Your cinnamon ice cubes should look like the cubes on the left and right.  The middle one is empty :)

Add bear and 2 ice cubes to the bag.


Zip up and shake it! ( you know the drill)


Let it dry.  You can add a face if you want.


Happy Crafting!
Ames

Monday, March 14, 2011

Jello Painting Shamrock

This was so much fun (messy but fun)! I would suggest doing this project on a day you plan to mop the floor.


You Will Need:

Paint shirt(aka old t-shirt)
Green Jello
Card stock


Plop some Jello on the paper and let the kiddos have at it.


Let it dry for 24 hours.  The larger chunks won't dry so just shake them off or cut around them.  The smaller pieces dry 3-D and shiny! Then just cut into a shamrock.


Proudly display on the fridge gallery!


Happy Crafting!
Ames

Sunday, February 27, 2011

Bubble Wrap Fish

I don’t care how old you are or how mature you are…you know you LOVE bubble wrap.  There’s just something therapeutic about that rhythmic pop pop pop. It’s one of those simple pleasures in life. And if it excites me this much it must be very thrilling for my almost 15 month old (yikes, when did that happen) cutie pie.  It was!
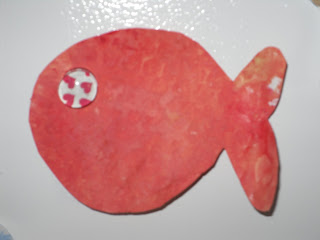
The "eye" is a homemade magnet.


You will need:
Bubble wrap (small piece works fine)
Paint (I used yellow and red to make a goldfish)
Paper cut into a fish shape (thank you google images for the pattern)
Ziploc bag (optional)


Spread a thin layer of paint on the bubble wrap.  The less paint you use the more pronounced the circles from the bubble wrap AKA the scales will be.
I used too much paint


Place the fish on top.


Now, you can either have your kids paint the fish with the bubble wrap or you can put the whole project in a baggie.  I chose the baggie route so Finley could do this project in the living room.  I find that it's confusing to put toddlers in their normal eating place and then tell them not to eat the paint, etc.  Living room = less attempted art consumption.


Peel the bubble wrap off and let the fish dry.

It’s hard to see the “scales” in the picture but they are there!
 
The "eye" is a homemade magnet.


Happy Crafting,
Ames


Wednesday, February 23, 2011

Rice Hedgehog

 How cute is this guy?  I had a pet hedgehog when I was in college.  His name was Leo and he was the sweetest little guy.  So, hedgehogs hold a special place in my heart.


You will need:

Brown paper cut into a hedgehog shape.  (I actually drew this one myself...that's how easy it is.  You can also google a pattern)

Glue

Rice (I used brown rice)

Optional: Box/bag to shake it in


Cut out a hedgehog and draw an eye.


Cover with glue.


For older kids have them sprinkle with the rice. Mine is 14 months so I put it in a box and had her shake it. She loved it because the rice makes lots of noise in the box. 

Let the hedgehog dry.  Then shake off the extra rice and hang it on the fridge.


Saturday, February 19, 2011

Cheerio Starfish

This craft was fun for the kids (and doubled as a snack although that wasn't the plan).  Here's what we did...


You will need:
Cheerios
Paper Plate
Glue
Pencil or Pen
Scissors (for the adult)


First, draw a starfish on a paper plate.  I can't draw so I used google images and actually traced it off the computer screen (very carefully of course). Then, fill in the starfish shape with glue.  Note: I should have drawn the outline on the other side of the plate so the lines would not show when it was done...oh well.


Pour some Cheerios on the plate and let the kids shake it around and play with them. (Older kids could put the Cheerios on the plate on their own.)We counted the Cheerios and I encouraged the kids to put them on the glue.  I put down a blanket in the living room. Of course Cheerios went everywhere but I just shook the blanket outside when we were done.  In my opinion this is way easier than sweeping up a million Cheerios off the kitchen floor (I sweep that darn floor enough!).


Let the plate dry and then shake off the extra Cheerios.


Use adult scissors to cut out the starfish!


Happy Crafting!
Ames


Wednesday, February 16, 2011

The Very Hungry Caterpillar: Marble Painting

Who doesn’t LOVE The Very Hungry Caterpillar?  Eric Carle’s book is a classic and one of my (many) favorites.  Here is a fun and easy craft to make your very own very hungry caterpillar!

You will need…
Shoe box
Piece of tape (to keep the box closed)
Green paint
Marbles
Yellow paper cut into a caterpillar shape *
Red marker or crayon

*I can’t draw to save my life but I managed to draw and cut out a somewhat decent caterpillar.  I just drew a series of connected ovals and cut it out. 

Place the paper caterpillar (there are in the picture but you only need one for the project), a blob of green paint, and a few marbles in the box.  If you are worried about a potential mess use a piece of tape to keep the box closed.


Shake…shake…shake!

(Ignore the crazy hair and red eyes....we were recovering from a meltdown)


Take the caterpillars out and let them dry.


Add an eye and mouth.

Come on...how cute is that? 

Happy Crafting!
Ames

Wednesday, February 9, 2011

Coffee Filter Butterflies

There is snow up to my knees outside but that doesn't mean we can't look forward to Spring with these adorable butterflies!

You will need:

Coffee Filter
Washable Markers
Spray Bottle w/water
Paper clip or rubber band or staple or pipe cleaner (to pinch the middle)


Encourage your toddler to draw on the coffee filter with the markers.


Spray with water.


Let dry for 2-3 hours.


Pinch in the middle to make a butterfly! You can use a staple, rubber band, pipe cleaner, paper clip, etc.


Happy Crafting!
Ames